
# In this article, we learn how to upload images in the database and project public folder.
# I have created a student form and stored the student detail and image.
- Model & Migration
- Controller
- View
- Routes
Storage Link
Step 1 :- Create Model
php artisan make:model Student Model :- app\Models\Student.php
<?php

        namespace App\Models;

        use Illuminate\Database\Eloquent\Factories\HasFactory;

        use Illuminate\Database\Eloquent\Model;

        class Student extends Model

        {

            use HasFactory;

            protected $guarded = [];

        }
Step 2 :- Create Migration
php artisan make:migration students Migration :- database\migrations\2022_11_05_160747_create_students_table.php
<?php

    use Illuminate\Database\Migrations\Migration;

    use Illuminate\Database\Schema\Blueprint;

    use Illuminate\Support\Facades\Schema;

    class CreateStudentsTable extends Migration

    {

        /**

         * Run the migrations.

         *

         * @return void

         */

        public function up()

        {

            Schema::create('students', function (Blueprint $table) {

                $table->id();

                $table->string('first_name');

                $table->string('last_name');

                $table->string('email');

                $table->integer('phone_number');

                $table->text('address');

                $table->text('image');

                $table->timestamps();

            });

        }

        /**

         * Reverse the migrations.

         *

         * @return void

         */

        public function down()

        {

            Schema::dropIfExists('students');

        }

    }
Step 3 :- Create Controller
php artisan make:controller StudentController Controller :- app\Http\Controllers\StudentController.php
<?php

    namespace App\Http\Controllers;

    use Illuminate\Http\Request;

    use App\Models\Student;

    class StudentController extends Controller

    {

        public function index()

        {

            return view('index');

        }

        public function store(Request $request)

        {

            $request->validate([

                'first_name'    => 'required',

                'last_name'     => 'required',

                'email'         => 'required',

                'phone_number'  => 'required',

                'address'       => 'required',

                'image'         => 'required',

            ]);

            // Image upload

            $image = $request->file('image')

            $imageName = time() . '.' . $image->extension();

            $imagePath = storage_path('app/public'). '/student-image/';

            $image->move($imagePath, $imageName);

            Student::create([

                'first_name'   => $request->first_name,

                'last_name'    => $request->last_name,

                'email'        => $request->email,

                'phone_number' => $request->phone_number,

                'address'      => $request->address,

                'image'      => '/student-image/'. $imageName

            ]);

            return redirect()->route('index')->with('success', "student data created successfully");

        }

    }
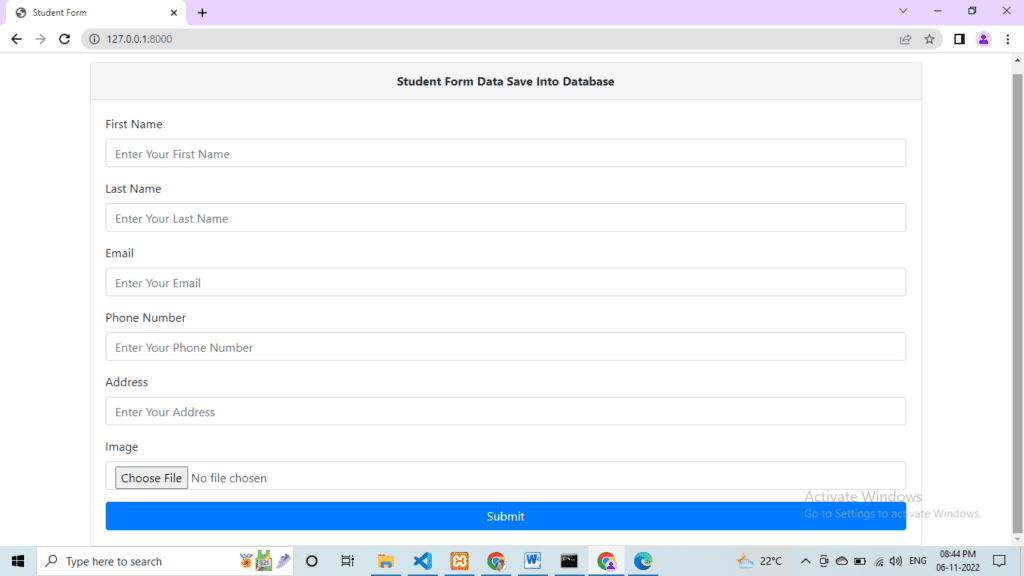
Step 4 :- Create view file index.php
View :- resources\views\Index.php
<!DOCTYPE html>

    <html>

    <head <meta name="csrf-token" content="{{ csrf_token() }}">

        <link rel="stylesheet" href="https://stackpath.bootstrapcdn.com/bootstrap/4.5.2/css/bootstrap.min.css">

        <title>Student Form</title>

    </head>

    <body>

        <div class="container mt-4">

            <div class="card">

                <div class="card-header text-center font-weight-bold">

                    Student Form Data Save Into Database

                </div>

                <div class="card-body">

                    <form method="post" action="{{route('store')}}" enctype="multipart/form-data">

                        @csrf

                        <div class="form-group">

                            <label for="firstName">First Name</label>

                            <input type="text" name="first_name" placeholder="Enter Your First Name" class="form-control">

                        </div>

                        <div class="form-group">

                            <label for="LastName">Last Name</label>

                            <input type="text" name="last_name" placeholder="Enter Your Last Name" class="form-control"

                                required="">

                        </div>

                        <div class="form-group">

                            <label for="email">Email</label>

                            <input type="text" name="email" placeholder="Enter Your Email" class="form-control" required="">

                        </div>

                        <div class="form-group">

                            <label for="phone_number">Phone Number</label>

                            <input type="text" name="phone_number" placeholder="Enter Your Phone Number"

                                class="form-control" required="">

                        </div>

                        <div class="form-group">

                            <label for="address">Address</label>

                            <input type="text" name="address" placeholder="Enter Your Address" class="form-control"

                                required="">

                        </div>

                        <div class="form-group">

                            <label for="image">Image</label>

                            <input type="file" name="image" placeholder="Upload Image" class="form-control" required="">

                        </div>

                        <button type="submit" class="btn btn-primary btn-block">Submit</button>

                    </form>

                </div>

            </div>

        </div>

    </body>

    </html>
Step 5 :- Create routes in web.php file
Routes :- web.php
<?php

    use Illuminate\Support\Facades\Route;

    use App\Http\Controllers\StudentController;

    /*

    |--------------------------------------------------------------------------

    | Web Routes

    |--------------------------------------------------------------------------

    |

    | Here is where you can register web routes for your application. These

    | routes are loaded by the RouteServiceProvider within a group which

    | contains the "web" middleware group. Now create something great!

    |

    */

    Route::get('/', function () {

        return view('index');

    });

    Route::get('/', 'StudentController@index')->name('index');

    Route::post('/', 'StudentController@store')->name('store');
Step 6 :- Link storage with command
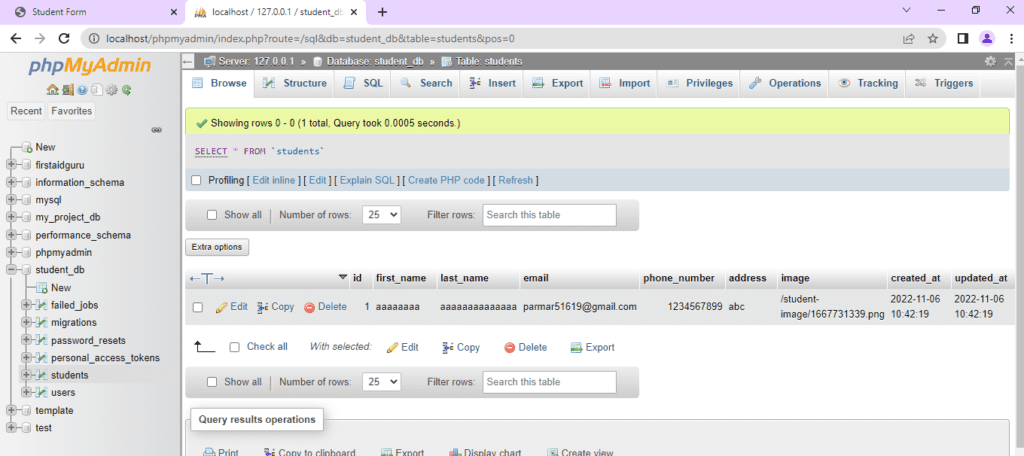
php artisan storage:link Submit form and check your database
Output :-